Wednesday, March 30, 2011

A new feeder bird!

Look closely at the finch feeder in this picture and see if you can find the bird that doesn't match. 


See the gal on the top left?  That's a Common Redpoll!  It's a first for us at our feeders and quite exciting too.  She fed briefly and moved on, perhaps toward her breeding/nesting ground in the Arctic/sub-Arctic.  You can read more fun information on redpolls here

We attended the Ohio Botanical Symposium and Butterfly Identification and Monitoring Workshop here in Ohio last weekend and are ALL fired up to learn more plants, more birds, more butterflies, more dragonflies, etc!  It's so great...this world we live on and amongst.  :)

Monday, March 28, 2011

New Soap!

Our Etsy shop is filling back up with lots of wonderful handmade soap!  The house smells soooo good!


There's more to come soon.  Stay tuned!

Saturday, March 26, 2011

Seed Starting

We're a little late for some seeds, but we finally got all the ones started that required early indoor planting and that we had room for.  We dug into our seed starting bin and found an assortment of collected containers to use.  Remember the homemade toilet paper pots?  We used up our whole stash!


We prepared all the pots and filled them with a seed starting mix from Garden's Alive


Then we wet the soil and planted the seeds!  We started: tomatoes, peppers, tomatillos, onions, basil, nicotiana,weld and indigo.  We started a lot of each of the vegetables so we had no extra space for plants that don't require indoor starting but benefit from it, except for the basil. 


Our collection of seed starting pots included old yogurt containers, leftover peat pots (which we won't buy again due to wetland degradation/destruction for this material), packing materials and of course the toilet paper pots.  We had two trays to hold the pots, but made the rest out of clear salad containers we kept.


Here's the final setup:


We found the two additional shop lights at Home Depot for around $10/each.

Think good germination! :)

Thursday, March 24, 2011

A Warm and Sunny Day Provides Much Motivation

Wow, this past Sunday was spectacularly warm and sunny so we did a bunch of fun yard stuff such as putting up a bat box...


...planting wildflowers where we had a burn pile...


...putting up another bird feeder...


Mowing our garden footprint down and...


...wind-rowing...


...raking...


...and composting the grass....


Here's a view from atop our roof showing the mowed garden footprint and the raised bed frames (far corner) we'd made recently too:


We also did yet more clean-up around our little green shed. Soon this will be ship-shape and ready to store the mower, extra wood and misc. items:


We also got a start on laying out a set of stone pathways behind our house. For us, sun and warmth equal motivation!

Tuesday, March 22, 2011

Raised Beds From Scavenged Wood and Free Rusty Nails

The unbelievable amount and variety of lumber left behind by the previous occupants of our place has come in handy for many free projects so far. Today we used this free lumber and a box of free old rusty nails to build 4 raised bed frames. Here's Jennifer laying out some boards. Our strategy was to minimize cuts (to save time) so we matched up like-size lumber to that end.


Who cares if they are bent and rusty, these nails were free!


Steve nailing up an end.


 Jennifer laying our another bed frame.


One more down.


Jennifer using plenty of nails so these babies with hold a lot of soil without falling apart.


Laying out boards for the last of 4 raised bed frames.


The final nail. We were as excited as the person who got to drive that gold spike connecting the trans-continental railroad! Jennifer has been researching nearby sources of decent compost to use in a mix to fill these up. Soon we will be planting root crops such as carrots, potatoes and beets! Free materials make for a satisfying project.

Sunday, March 20, 2011

Planting Greens and Re-Connecting the Cistern

Cold frame is finished so time to plant the first seeds of the 2011 growing season!


We planted various greens including spinach, mixed greens and chard.


A moist seedbed and soon we'll have the first sprouts of 2011...


The sun was kind to our soil today...


Another quick project was to re-connect our downspouts to the cistern. We simply cut a hole in the cistern lid and inserted the downspout (wrapping it in foam to fill any gaps that might allow small critters to fall into the water).


Here's the set-up, all ready for the next showers. We plan to install an overflow as well. Once the cistern is full the overflow will transmit extra water to another location (perhaps a constructed wetland or something along those lines).

Wednesday, March 16, 2011

Cold frame from salvaged windows and lumber

The soon-to-be garden is still quite saturated with water so removing the sod is not feasible yet.  We've got loads of greens and peas to plant and the stress was mounting, mostly for Jennifer.  Steve said: "well, why don't we plant them elsewhere?"  The man of clarity.  We've wanted to build a cold frame for quite some time and figured this would solve our seed planting issue too so we got to work.

First, we gathered the extra windows we had around the property.  (All left from some prior owner.)

And came up with a design....

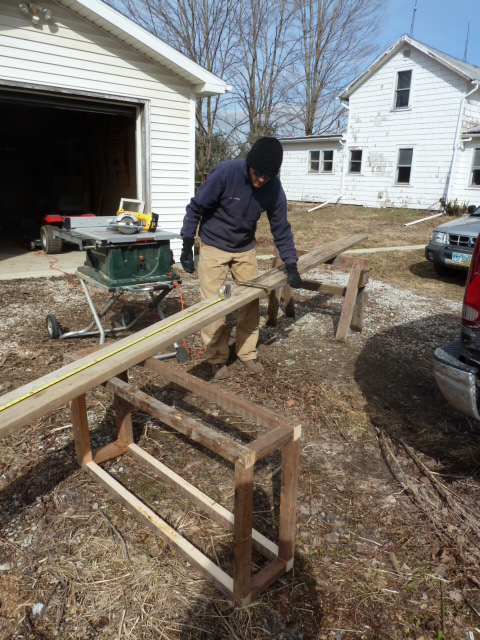
We measured the full length and width of our windows and found salvaged boards long enough to cut our needed sizes from.


We framed the base first, joining the boards with screws...


Cutting the angle came next.  I want to note we built this as we went.  That's Steve's preferred method for building and it's great!  The cold frame structure completely evolved as we went along.  To determine the angle, we held the window at the angle we wanted, found a wide enough board and drew a line on the board from bottom corner to top corner.  Amazingly, it provided us with two right sized pieces - one for each end.


We made the angled boards for the interior supports in the same way.  We then thought about window attaching.  Steve recalled a box of hinges he saved from removing an old storage bin at the front of our chicken coop so we put those to use.


6 hinges - exactly what we needed for this cold frame!  A few were bent so we pounded them back into shape.  
Next, we attached the windows!

 
Check out those hinges!

We cleaned the glass so the plants can get maximum sunlight...

Then, we moved the cold frame to the south side of our house and prepared the soil...

We're pretty excited about this!  Imagine Jennifer squealing.  :)

Ready for some compost and then seeds!

Ta-dah!  If you look closely, you can even see the little wire pulls Steve installed to serve as handles.
The handle on the side of the box was left here by a prior owner.

We spent not one dime on this cold frame, but will harvest hundreds and hundreds of dollars worth of greens no doubt.  Pretty cool.